


Enemy range-rings: A handy tactical option
It has been a while since our last front-page post and, as readers of our build-roll thread are aware, we have been busy. With the official internal beta now underway, the process of shoring up Command‘s functionality and content for the v1 release is in full swing. One of the brand-new additions in Build 349 is range-symbols for non-friendly units.
Compared with earlier attempts at implementing this feature in other titles, enemy range-rings in Command are not a “magic” piece of intelligence provided to the player; instead, they are based solely on the information obtained through the player’s assets. The more accurate a contact’s identification status becomes, the more information about the contact’s abilities can be provided on the map.
Let us consider an example:
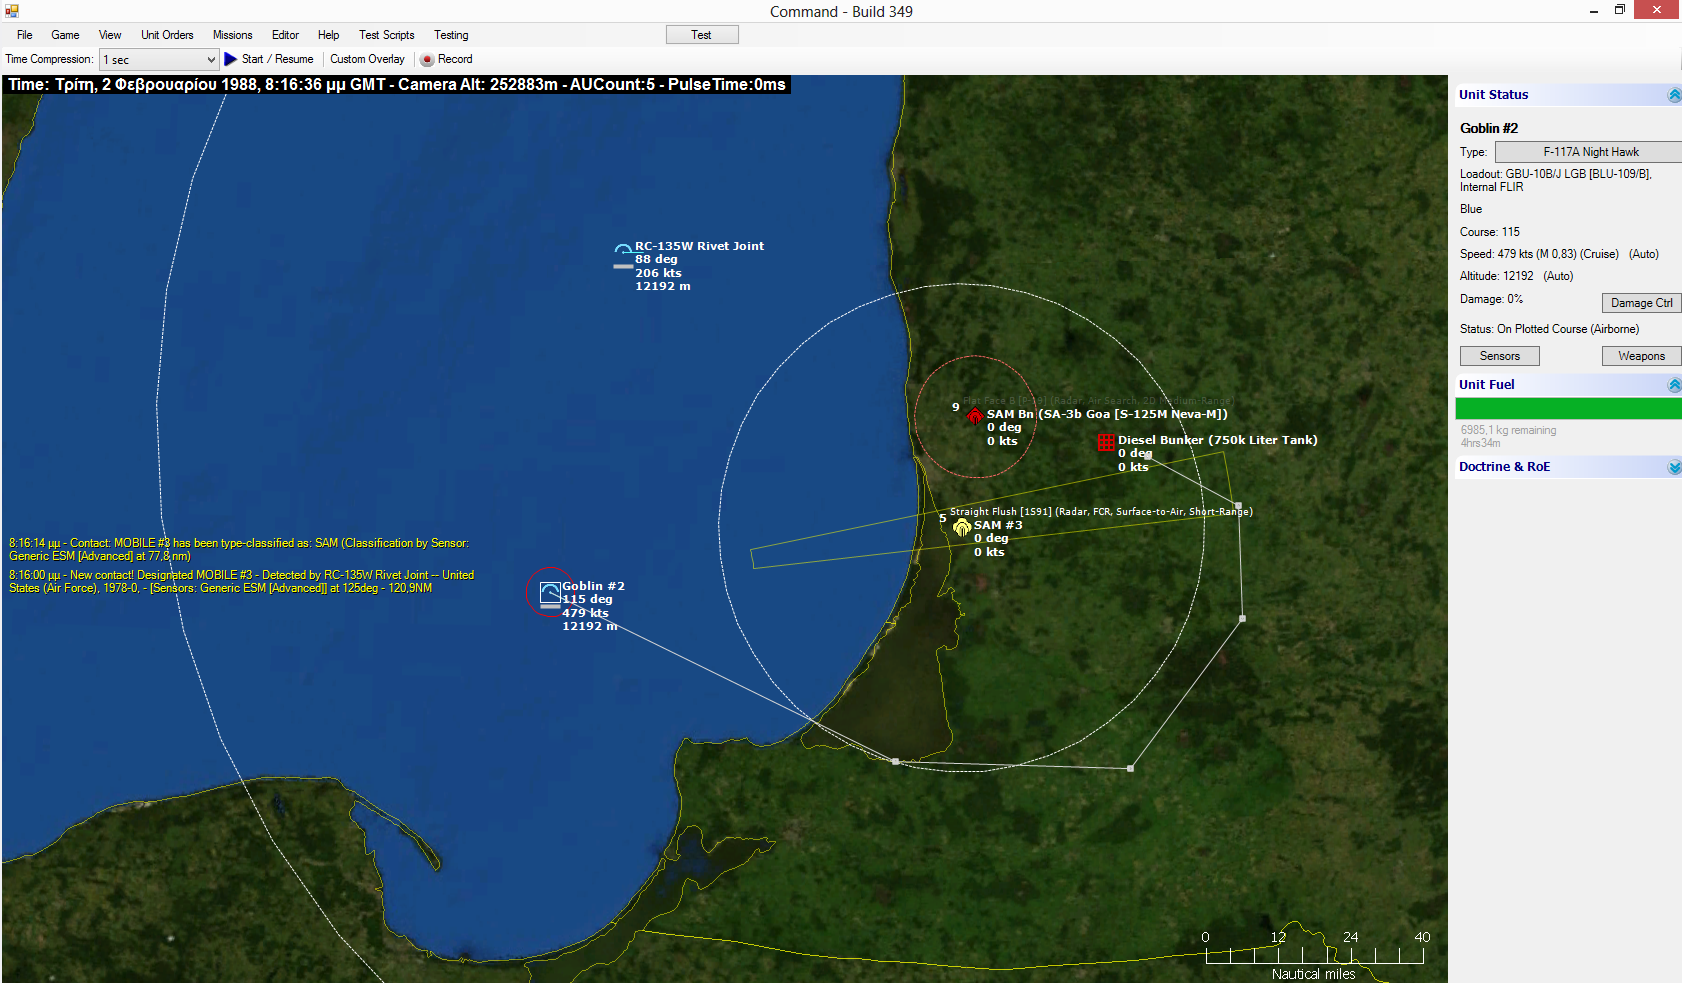
In this notional strike ingress scenario, an F-117A is attempting to penetrate an air defence screen and strike a fuel bunker. It is aided by an RC-135 electronic snooper, an invaluable asset in such an operation.
The fixed SA-3 site has been automatically detected at the start of the scenario, so its precise location and identification are known. This allows the friendly “staff” to plot its maximum missile range (red circle) and maximum radar range (very large white circle) with confidence. Note that, to avoid confusion with friendly range symbols, enemy symbols are drawn with dashed lines instead of solid. Like friendly symbols, they can be merged to remove visual clutter.
There is, however, an extra pop-up threat which is detected by both aircraft, south of the SA-3 site. Preliminary identification points to a SAM element, and a “Straight Flush” radar emission is detected and identified. Gut instinct points to a SA-6 battery, but the EW operators are not yet confident enough for a positive ID (which would also allow for plotting a missile range circle). The detected radar, however, constitutes a detection threat by itself, so it is plotted (medium white circle) immediately. Notice that the contact’s location is still quite uncertain, so the radar’s actual coverage can very significantly; this is an important consideration for the player. If another-longer range radar emission is detected from the same contact, the circle will grow accordingly.
Based on this visual information, the player plots the penetration route depicted in the screenshot, trusting that it will keep the aircraft out of the dangerous engagement radar and, for as long as possible, hopefully out of detection range of the SA-3 battery as well. If the pop-up SAM battery’s location is subsequently narrowed down to a point east of its current estimate, the route will likely have to be revised.
Out next demo is a hot item… in more ways than one.
- What is 'Command'?
- Professional, Academic & Student Edition
- What the Press Say
- Customer Testimonials
- Scenario & Add-On Downloads
- Mega-FAQ
- Official Forum
- Contact Us
- Links
-
- What is 'Harpoon'?
- Waypoint Magazine
- Harpoon3.6 1937-1949
(WW2)
Database & Scenarios - Harpoon3.6 1950-1964
(Colonial Wars)
Database & Scenarios - Harpoon3.6 1965-1979
(Missile Age)
Database & Scenarios - Harpoon3.6 1980-2015
(DB2000)
Database & Scenarios -
Archives
- February 2024
- December 2023
- October 2023
- September 2023
- August 2023
- July 2023
- May 2023
- March 2023
- January 2023
- December 2022
- November 2022
- October 2022
- September 2022
- August 2022
- March 2022
- November 2021
- October 2021
- September 2021
- August 2021
- May 2021
- April 2021
- March 2021
- October 2020
- May 2020
- March 2020
- February 2020
- January 2020
- November 2019
- October 2019
- September 2019
- May 2019
- March 2019
- February 2019
- January 2019
- November 2018
- October 2018
- September 2018
- July 2018
- May 2018
- March 2018
- February 2018
- January 2018
- November 2017
- October 2017
- September 2017
- July 2017
- May 2017
- April 2017
- March 2017
- February 2017
- January 2017
- December 2016
- November 2016
- October 2016
- September 2016
- August 2016
- July 2016
- May 2016
- April 2016
- March 2016
- February 2016
- January 2016
- December 2015
- October 2015
- September 2015
- August 2015
- July 2015
- June 2015
- May 2015
- April 2015
- March 2015
- February 2015
- January 2015
- December 2014
- November 2014
- October 2014
- September 2014
- August 2014
- July 2014
- June 2014
- May 2014
- April 2014
- March 2014
- February 2014
- January 2014
- December 2013
- November 2013
- October 2013
- September 2013
- August 2013
- July 2013
- June 2013
- May 2013
- April 2013
- February 2013
- January 2013
- December 2012
- October 2012
- August 2012
- July 2012
- April 2012
- January 2012
- November 2011
- October 2011
- September 2011
- July 2011
- May 2011
- April 2011
- March 2011
- February 2011
- December 2010
- November 2010
- October 2010
- August 2010
- June 2010
- May 2010
- April 2010
- March 2010
- February 2010
- January 2010
- December 2009
- November 2009
- October 2009
- September 2009
- August 2009
- July 2009
- June 2009
- May 2009
- April 2009
- February 2009
- December 2008
-
Recent Posts
Main Menu
Webshop
BUY at MatrixGamesBUY on Steam
BUY on Humble store
